
Support
Thank you very much for purchasing my Theme. We've put a lot of hard work into it, and we hope you love it as much as we do. As far as the documentation is concerned, we have tried to cover as much as possible to help you get your new Theme up and running and to help you customise it.
If you have any questions or problems that aren't answered here, please feel free to email us
We love to hear your feedback - if you find any bugs or have suggestions for improvements please get in touch. Nearly all of the time we follow your advice.
If you like our work, please rate it. If you’re about to rate it with less than 5 stars, please let us know the reason first and we will do our best to improve the theme. Thanks so much!


WordPress Information
Since WordPress is constantly being updated information about how to install WordPress may become out of date, so you always can read official guide HERE
Below are all the useful links for WordPress information:
- WordPress Codex – general info about WordPress and how to install on your server.
- First Steps With WordPress – general information that covers a wide variety of topics.
- FAQ New To WordPress – the most popular FAQ’s regarding WordPress.
Theme Installation
Once you've downloaded the installation file on ThemeForest, extract it and locate a file called Pylon.zip. You can install the theme by using one of two installation methods:
WordPress upload
- Login to WordPress admin.
- Go to Admin panel > Appearance > Themes > Add New > Upload Theme.
-
Click on Choose File and select
Pylon.zip. - Click on Install Now.
- When your theme is successfully installed, click Activate to activate the newly installed theme.
FTP upload
- Using FTP client, login to the server where your WordPress website is hosted.
-
Using FTP client, navigate to the
/wp-content/themes/directory under your WordPress website's root directory. - Using FTP client, upload the Paragon directory to themes directory on remote server.
- Once uploaded, navigate to Dashboard > Appearance > Themes in the WordPress Dashboard and hit Activate below your newly uploaded theme.
When you use first or second method, please make sure that you're uploading the Pylon.zip file, not entire package you downloaded. If you upload the wrong file you will get an error stating
“Error: missing style.css stylesheet.”
Once installation is complete, your Pylon theme will be ready to use. You should now see Pylon theme as active.

Installing Required Plugins
When you first install the theme you'll see a popup on your dashboard from the theme asking you to install a number of plugins.


You must install and activate all plugins
Activate Your Pylon WordPress Theme
Where to Find Your Purchase Code
The first question that comes to your mind is: How can I download my purchase code? Your Envato purchase code is required to activate the Pylon Theme.
👉 How to Download Purchase Code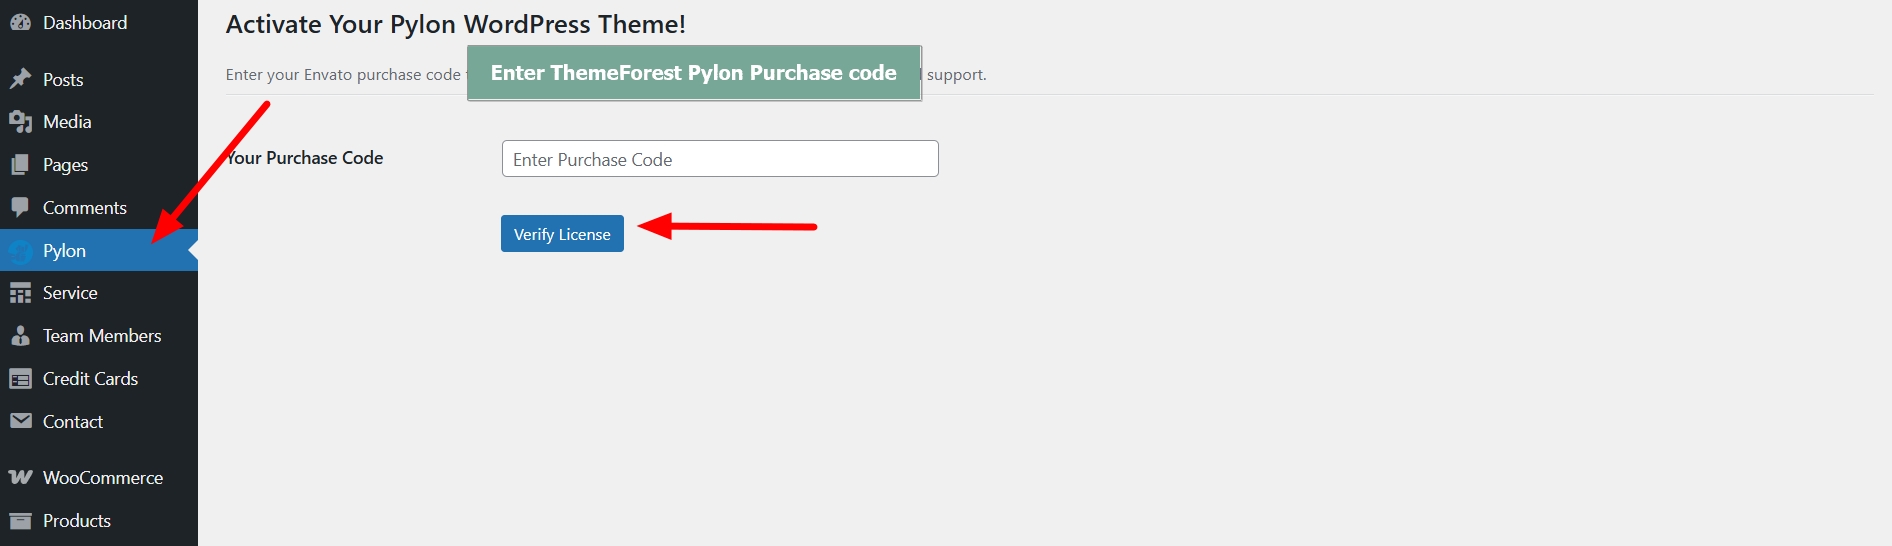
How to Activate Your License
Once you have your purchase code, follow these steps to activate your theme:
- Log in to your WordPress admin panel.
- Go to Wp-admin > Pylon (added by the Pyloncore plugin).
- Enter your Enter Purchase Code in the field provided.
- Click the Verify License button.
- Once verified, you’ll unlock full access to demo import, theme updates, and premium support.
✅ Your license is now active! You can enjoy all features of the Pylon Theme.
Revoke License
You can also revoke your license anytime if you want to migrate from a development/staging site to your live production site. This ensures your purchase code can be re-used on the final domain.
- Go to Wp-admin > Pylon .
- Click Deactivate License on your staging or development site.
- Re-enter the purchase code and activate it again on your live domain.
Demo Install
Install Plugin Pyloncore and go to Appearance > Import Demo Data
Install and Activate all required plugins and click to Install. The upload process can take up 5 minutes. So please, be patient and do not close the page.

If the server is not available and the demo import does not work
I have created a folder labeled Demo data which contains demo data.
- Log-in to your WordPress backend and open your WordPress importer Tool>Import>WordPress.
- Install and Run WordPress Importer
-
Click on Choose file and select the
demo.xmlfrom folder Demo
Or download demo file Demo Import - Check the box Download and import file attachments. This will download attachments for images included in the Live Preview demo.
- Click Upload file and import.
You now just need to wait for the importer to finish. This might take a few minutes depending on your hosting server speed.
Theme Settings
Ok, so far we have installed the theme, we have installed the plugins and imported the demo data, whats next?
The final step in getting your new theme setup and ready for you to edit as you wish is to setup your home page and menu. To begin, head to Settings > Reading, here you will need to set your Front Page.

Finally, if you have not done so already, its highly advisable to update your permalink settings. To do this, head to Settings > Permalinks and select any option other than default. We recommended 'postname' - as you can see below.

How to Set Up Menus
To create and activate your new menu follow the steps below:
- Log in to that site as an administrator.
- Go to Appearance > Menus panel.
- Give your menu a name and click Create Menu button.
- Add few simple links form Links tab.
- Save your menu.
- Navigate to Manage Locations tab (at the top of the screen).
- Choose your new menu as Main Menu.
- Save changes.

Theme Options
The main theme settings are in Theme Options Panel
- Log in to that site as an administrator.
- Go to Appearance > Pylon Options
General Setting

Typography

Header Settings

Header Options

Header Search

Menu Options

Quotes Options

Mid Icons
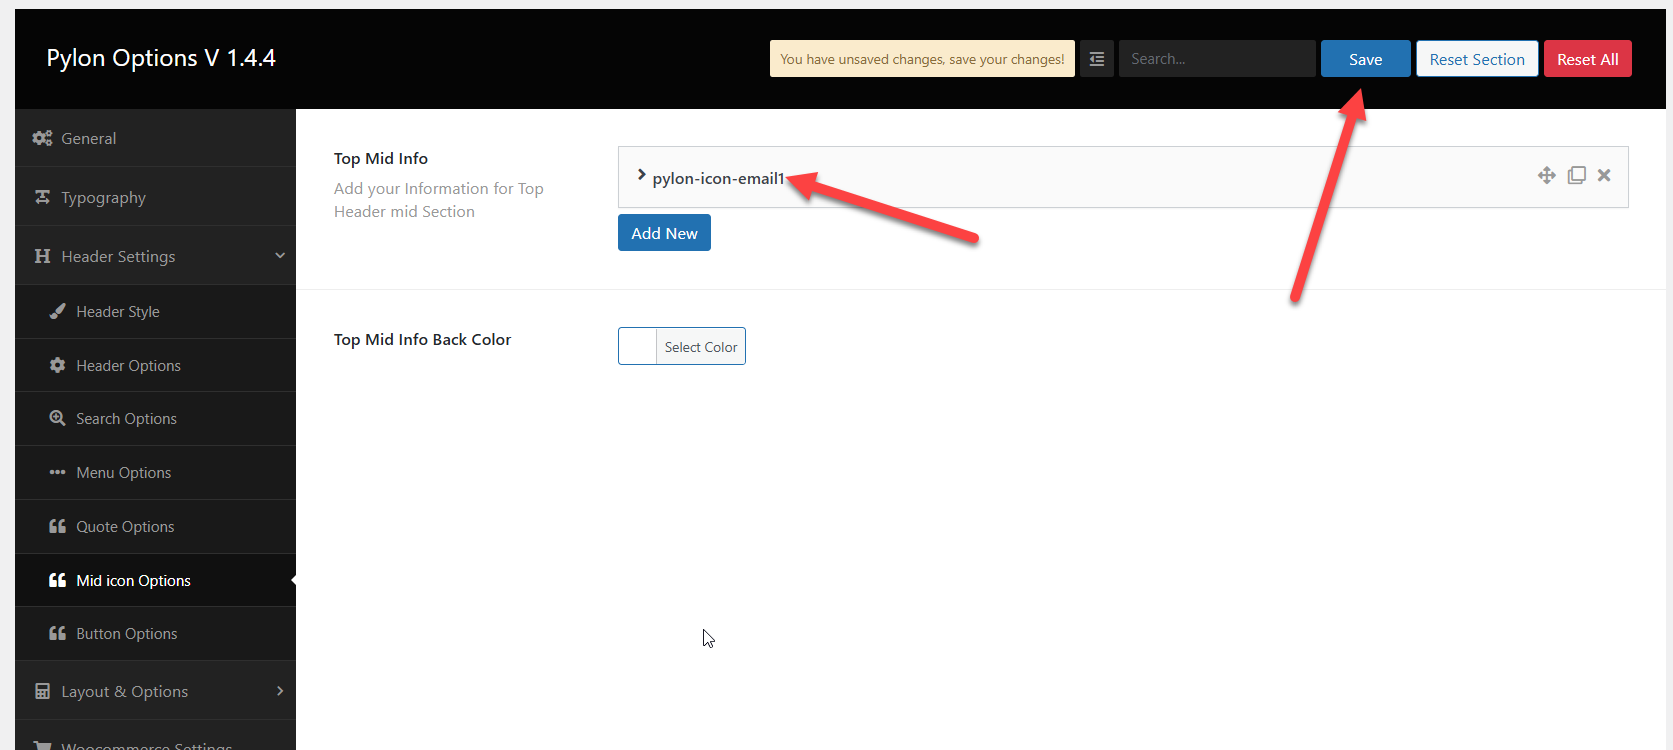
Button Options

Banner / Breadcrumb Area

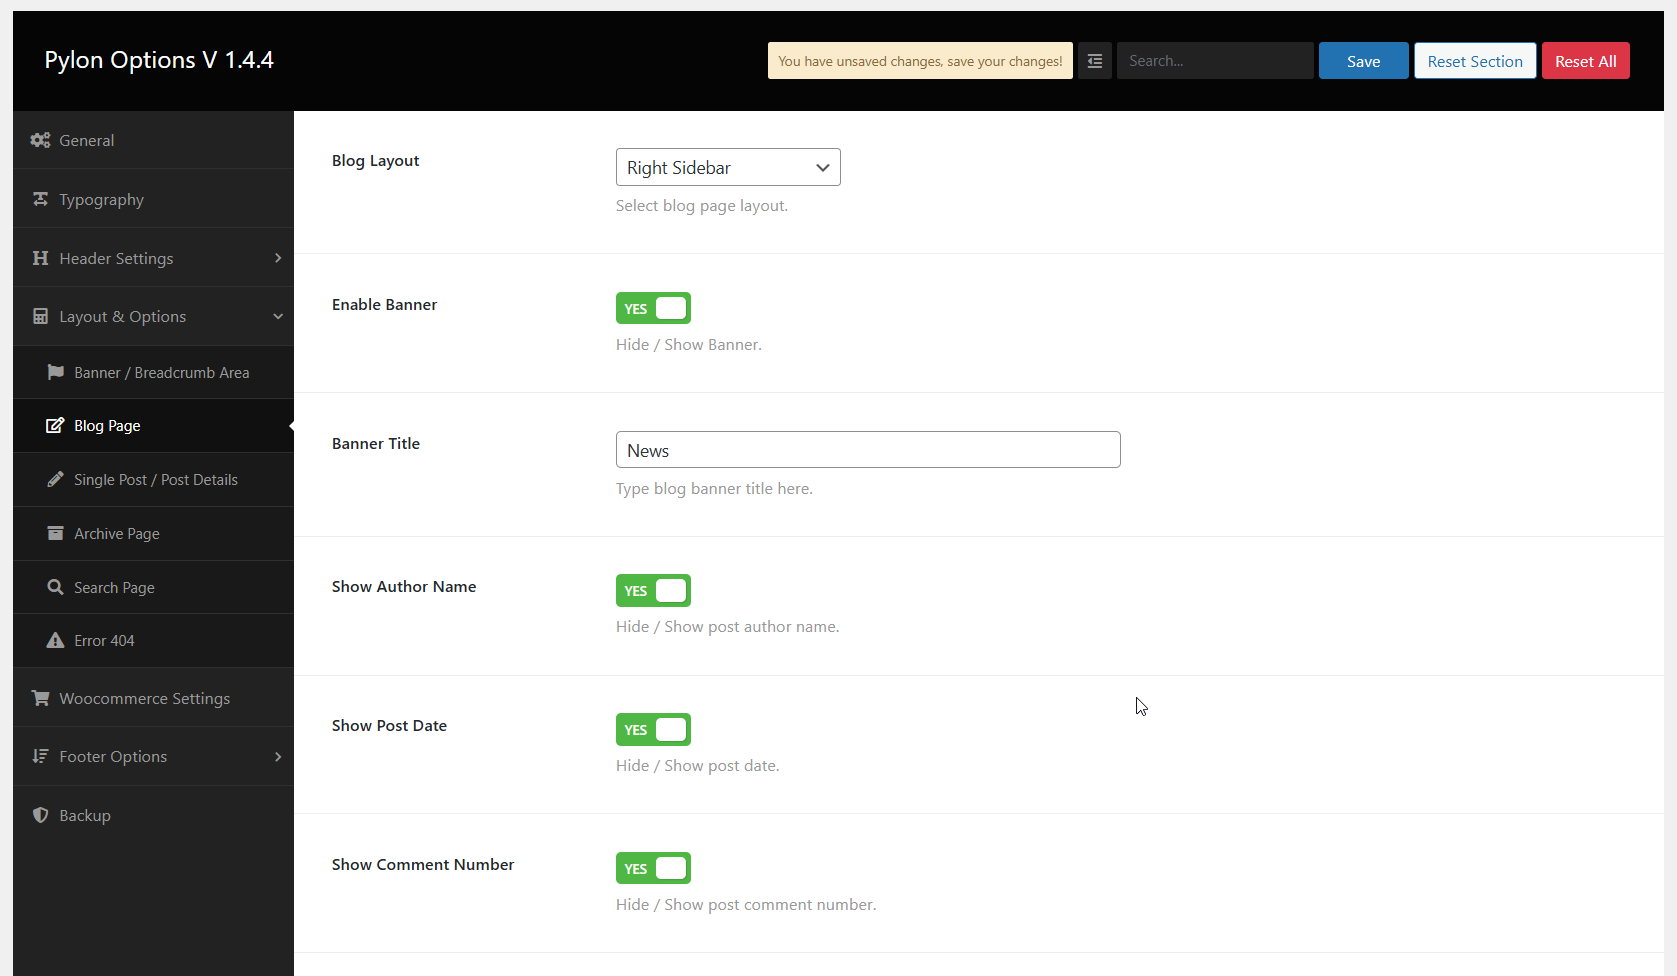
Blog Page
Single Post / Post Details

Archive Page

Search Page

Error 404

Woocommerce Settings

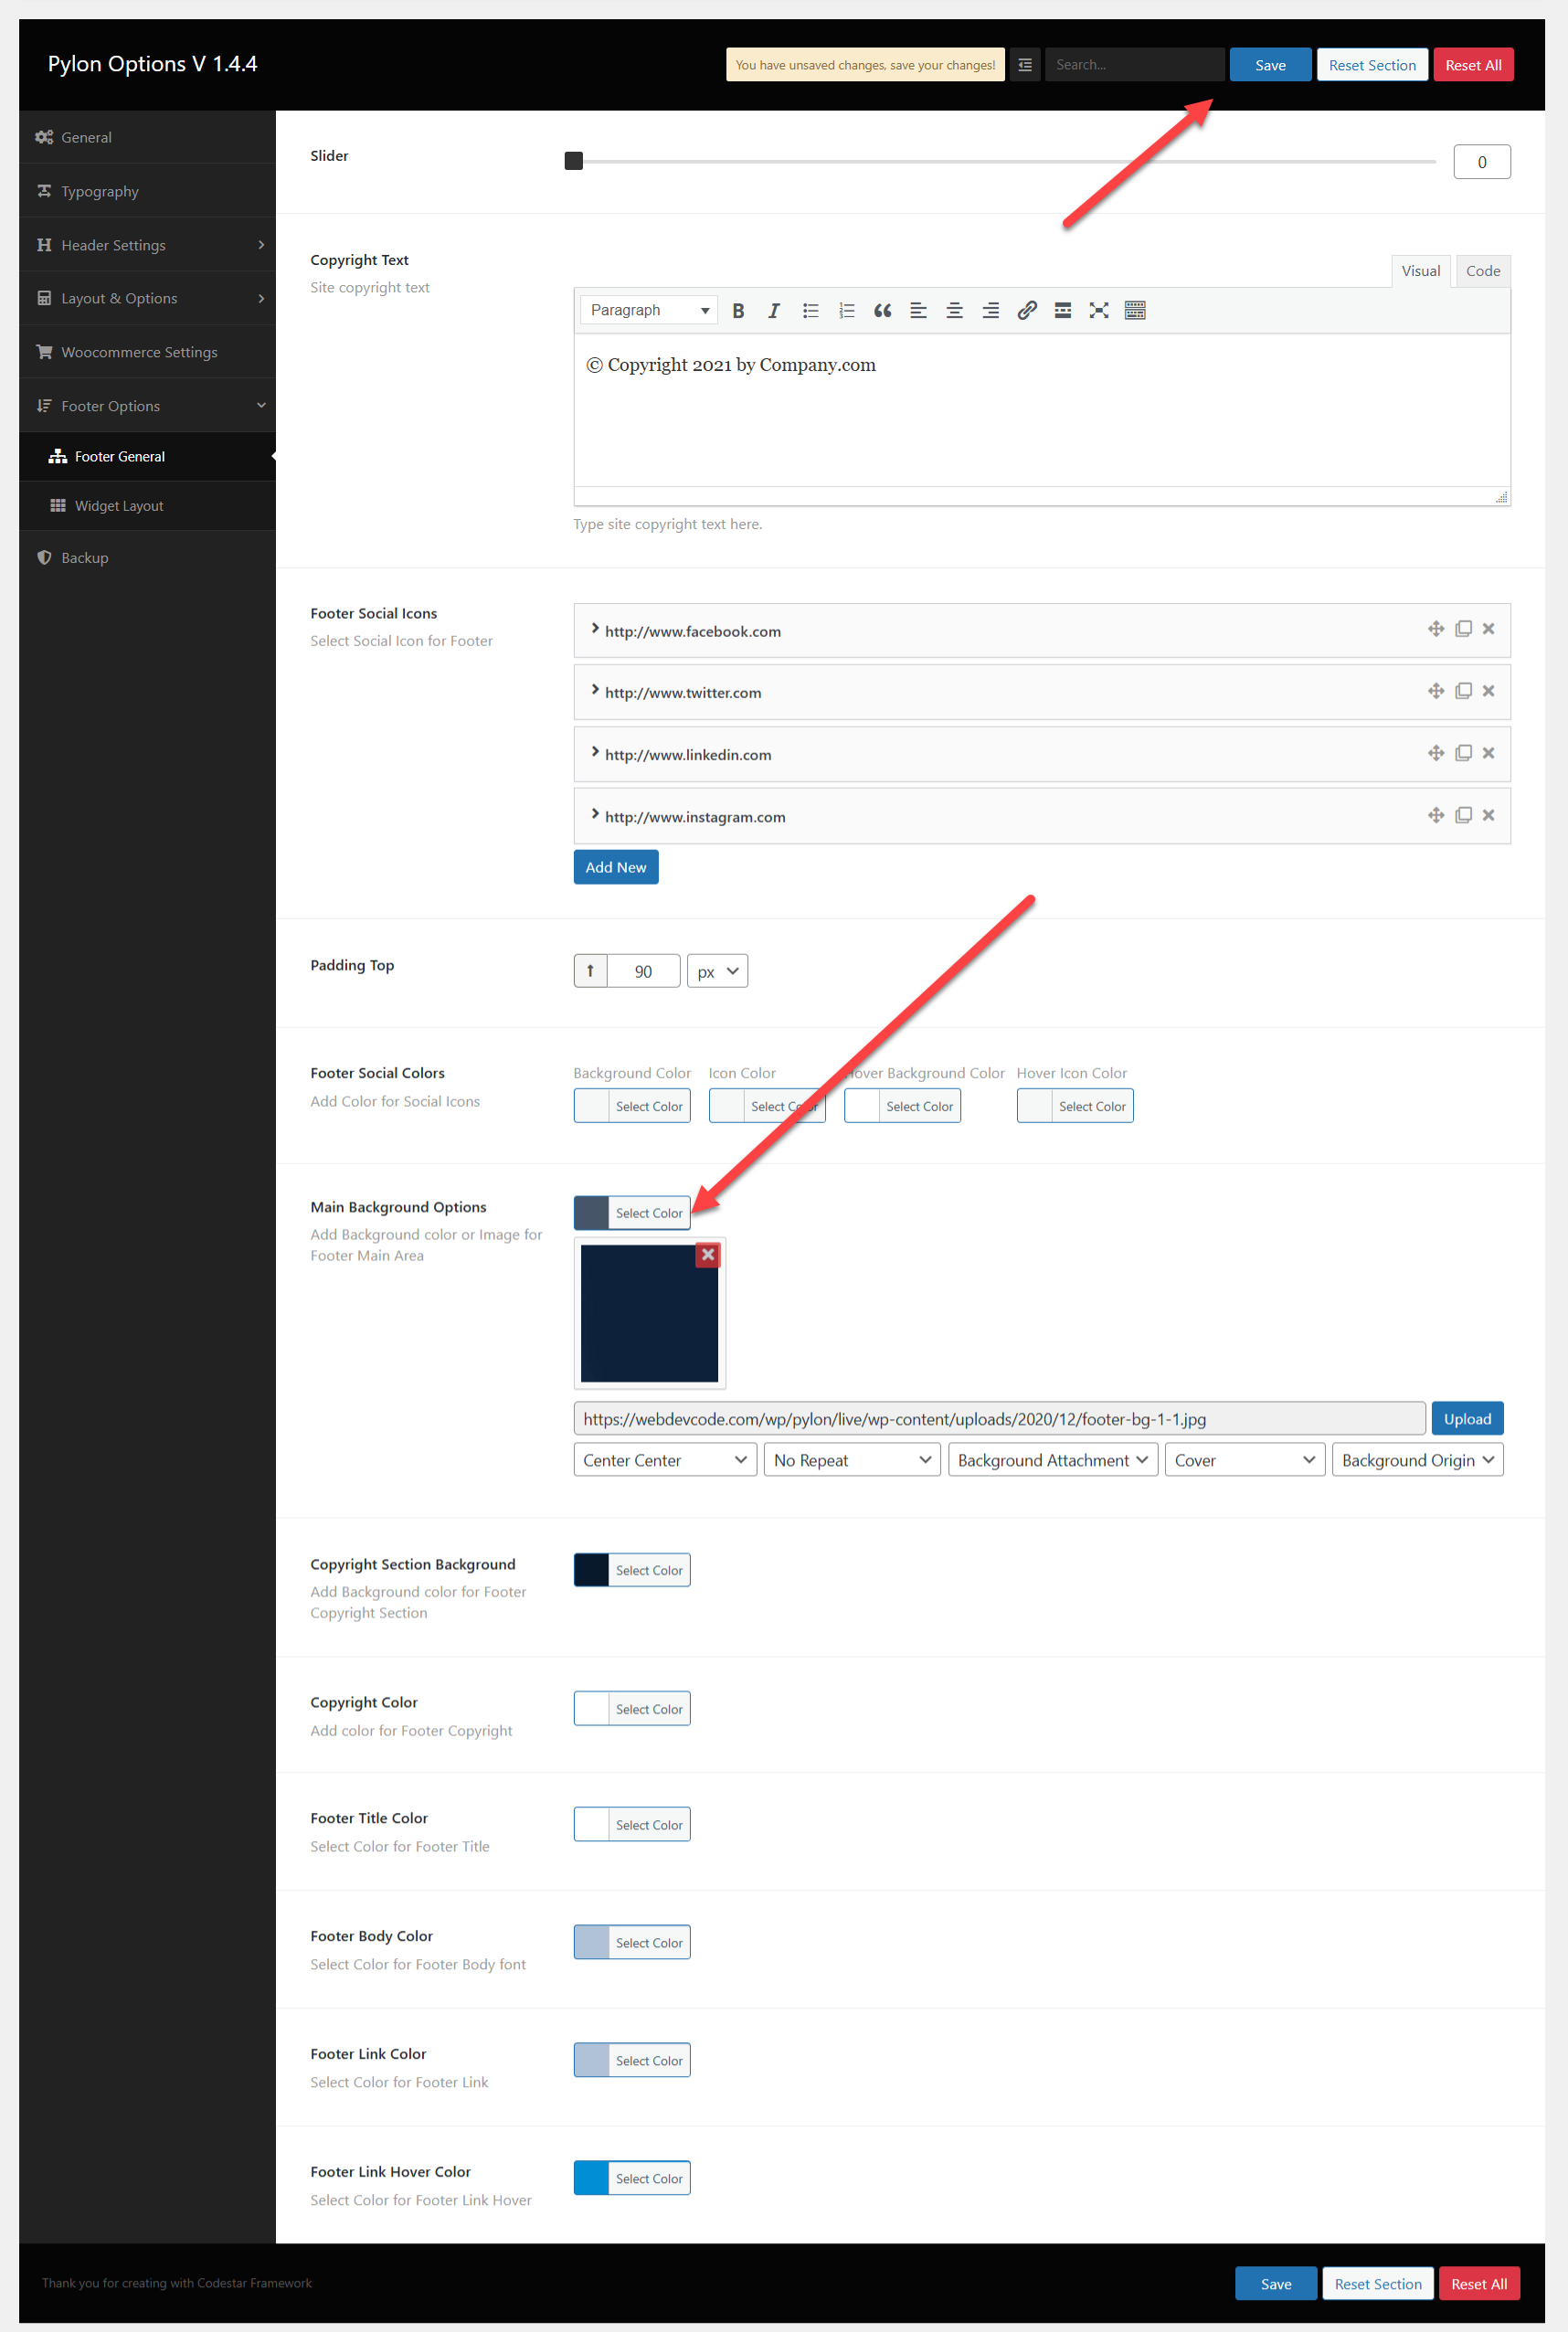
Footer General
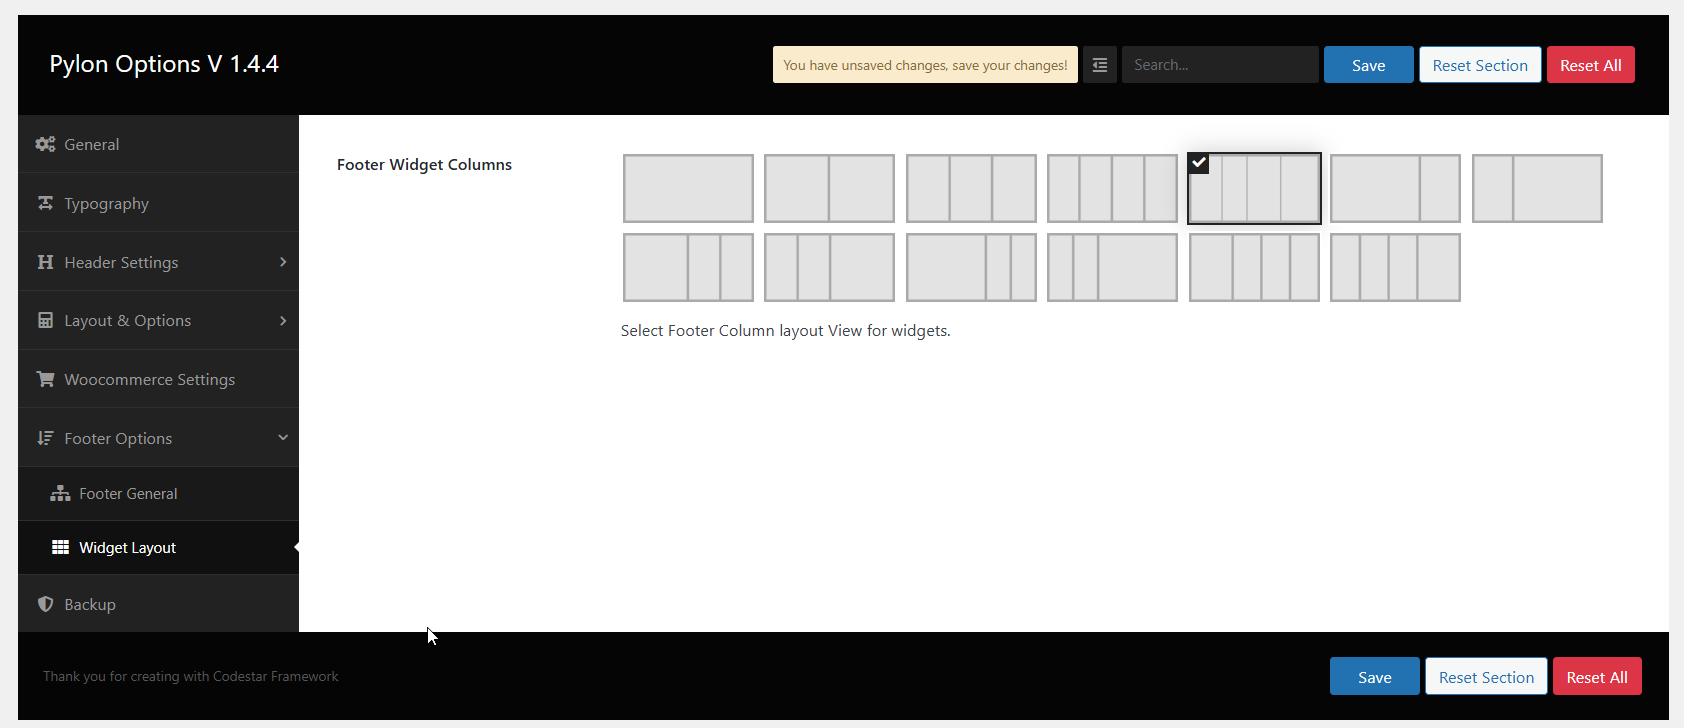
Footer Widget
Backup Settings

Custom Post
How To Use Change Slug
wp-content\plugins\pyloncore\inc\wp-custom-post.php
Open wp-custom-post.php file in any editor
function pylon_register_custom_posts()
'rewrite' => array(
'slug' => 'pylon_service',
'with_front' => true
),
change this value 'pylon_service'
Services

Credit Card

wp-admin >> Setting >> Permalink update it
Swiper Js Elementor

Elementor Page Builder
How To Use Elementor Page builder

Title Custom Widget

Elementor Custom Addons
Title Addons
Title three style
Slider Addons
Slider three style

Slider2 Addons
Slider2 two style

Featured Box Addons
Featured five style

About Us Addons

Loan calculator Addons
Loan calculator button two style

Service Addons
Service six style

Content List With Number Addons
Content List With Number three style

funfact Addons
funfact two style

Counter Box Addons
Counter Box three style
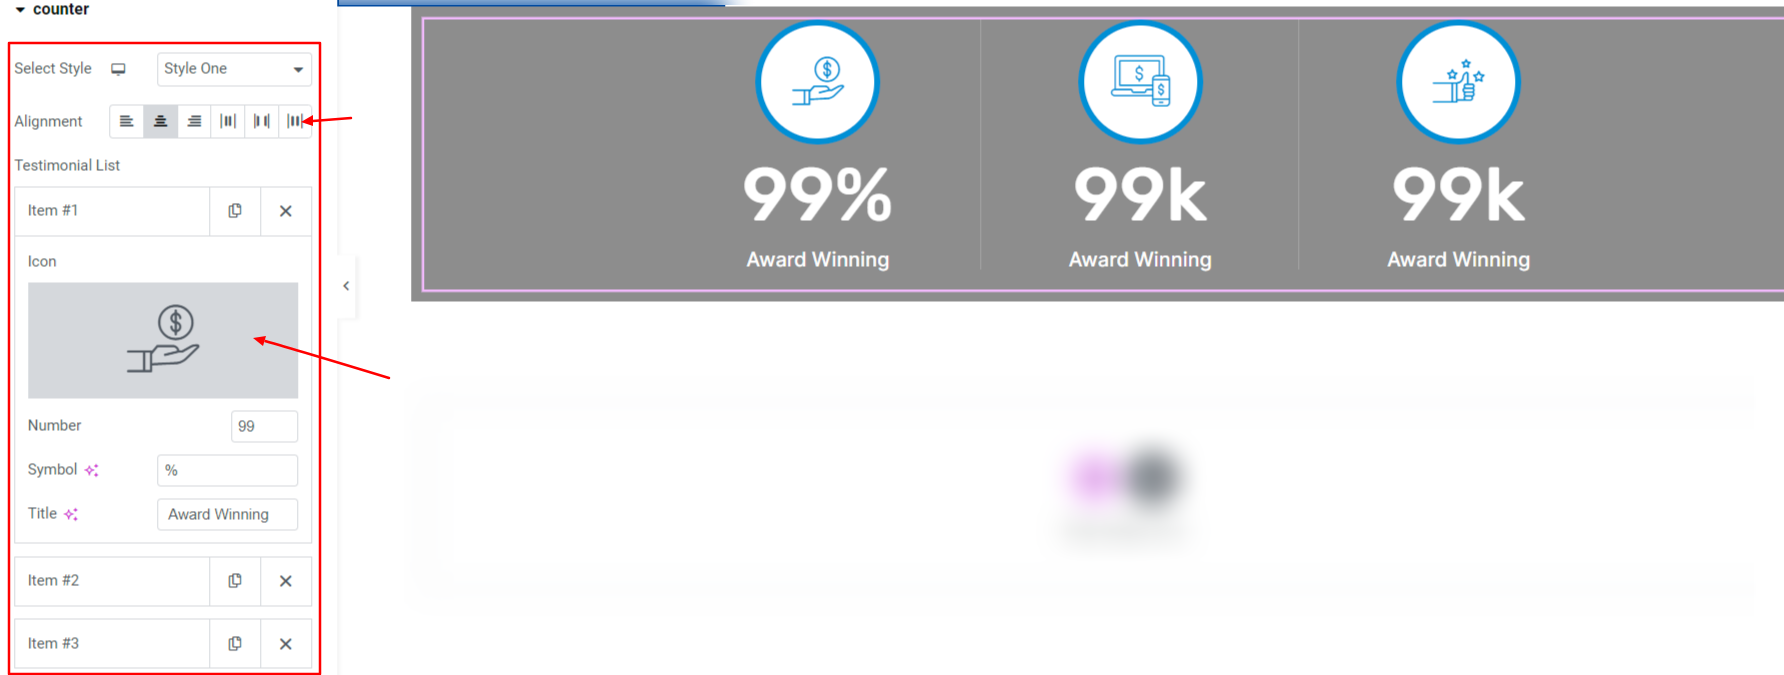
Testimonial Addons
Testimonial five style

Image Addons
Image Seven style

Progress Bar Addons
Progress Bar two style

Blog Addons
Blog five Style

Client Logo Addons
Client Logo two style

Call To Action Addons
Call To Action two style

Icon box Addons
Icon Box five style

Popup Video Addons

Accordion Addons

Team with Section Addons

Team Addons

Credit Card Addons

Button Addons
Button two style

Contact Info Addons

Image With Title Addons

Banner Addons

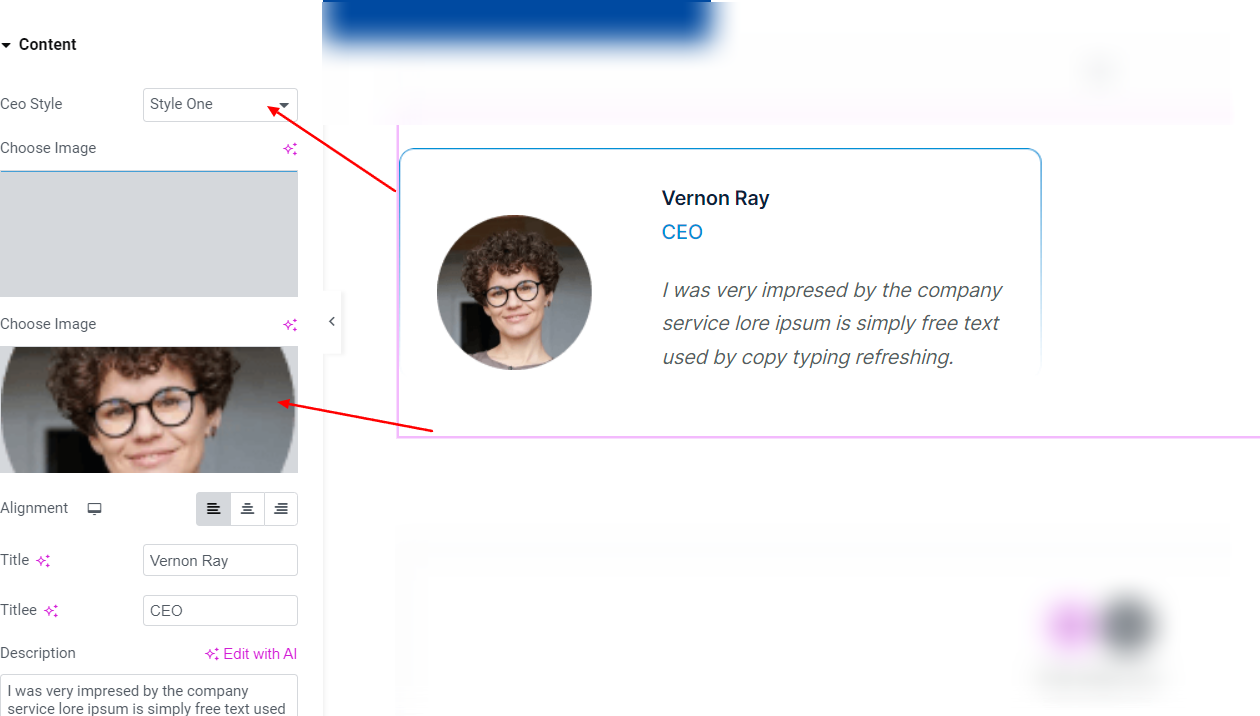
Company CEO
Contact Form
For the form, we use the plugin Contact Form 7
Contact Form 7 is our recommended form plugin for WordPress. It is a simple but powerful form creator for WordPress. Here we will show you how to use Contact Form 7 to create and edit a basic form.
After Contact Form 7 is installed, you will find a new menu item in your WordPress admin area called Contact, here is where your forms and created and edited.
Apply Now Form
<div class="contact-one__form">
<div class="row low-gutters mb-30">
   <div class="col-md-12">
<div class="block-title mb-20">
                <p class="small-title mb-0"> Calculate you loan amount</p>
            <h2>Loan Details</h2>
                        </div>
   </div>

<div class="col-md-6">
         <label>Loan Amount*</label>
         [number* loanamount placeholder "Loan Amount"]
    </div><!-- /.col-md-6 -->
    <div class="col-md-6">
                 <label>Monthly Income*</label>
         [number* income placeholder "Monthly Income"]
    </div><!-- /.col-md-6 -->
<div class="col-md-6">
         <label>Purpose of Loan*</label>
         [select* purposeloan "Business" "Home Purchase" "Car Purchase" "Holiday" "Wedding" "Investments" "Payday Loan" "Startup " "Other"]
    </div><!-- /.col-md-6 -->
    <div class="col-md-6">
                 <label>Loan Years*</label>
         [select* loanyears "6 Months" "1 Year" "2 Years" "3 Years" "4 Years" "5 Years" "6 Years" "7 Years" "8 Years" "9 Years" "10 Years" "11 Years" "12 Years" "13 Years" "14 Years" "15+ Years"] </div><!-- /.col-md-6 -->
</div><!-- /.row -->
 <div class="row mb-30">
   <div class="col-md-12">
<div class="block-title mb-20">
                <p class="small-title mb-0">Ask for more details</p>
            <h2>Personal Details</h2>
                        </div>
   </div>
    <div class="col-md-6">
         <label>Full Name <strong>[as per Taxpayer ID]</strong></label>
         [text* YourName placeholder "Full Name"]
    </div><!-- /.col-md-6 -->
    <div class="col-md-6">
<label>Email*</label>
        [email* your-email placeholder "Your Email"]
    </div><!-- /.col-md-6 -->
    <div class="col-md-6">
<label>Mobile Number*</label>
        [number* phonenumber placeholder "Mobile Number"]
    </div><!-- /.col-md-6 -->
    <div class="col-md-6">
<label>Marital Status*</label>
[select* maritalstatus "Single" "Married" "Co Habiting" "Separated" "Divorced" "Civil Union" "Widowed" "Partner"]
    </div><!-- /.col-md-6 -->
    <div class="col-md-6">
         <label>Birth Date* <strong>[as per Taxpayer ID]</strong></label>
         [text* birthdate placeholder "Birth Date"]
    </div><!-- /.col-md-6 -->
    <div class="col-md-6">
<label>Number Of Dependents*</label>
[select* numberofdependents "0 Dependents" "1 Dependents" "2 Dependents" "3 Dependents" "4+ Dependents"]
    </div><!-- /.col-md-6 -->
</div><!-- /.row -->
 <div class="row mb-30">
   <div class="col-md-12">
<div class="block-title mb-20">
                <p class="small-title mb-0">Street, City And State</p>
            <h2>Address Details</h2>
                        </div>
   </div>
    <div class="col-md-4">
<label>House No/Name*</label>
        [text* house-no placeholder "House Number/Name"]
    </div><!-- /.col-md-4 -->
    <div class="col-md-4">
<label>Street*</label>
        [text* street placeholder "Street"]
    </div><!-- /.col-md-4 -->
    <div class="col-md-4">
<label>City*</label>
        [text* street placeholder "City"]
    </div><!-- /.col-md-4 -->
    <div class="col-md-4">
<label>State*</label>
        [text* state placeholder "State"]
    </div><!-- /.col-md-4 -->
    <div class="col-md-4">
<label>Country*</label>
        [text* country placeholder "Country"]
    </div><!-- /.col-md-4 -->
    <div class="col-md-4">
<label>Pin Code*</label>
        [text* pin placeholder "Pin Code"]
    </div><!-- /.col-md-4 -->
</div><!-- /.row -->
 <div class="row mb-10">
   <div class="col-md-12">
<div class="block-title mb-20">
                <p class="small-title mb-0">Employment and other stuff</p>
            <h2>Other Details</h2>
                        </div>
   </div>
<div class="col-md-6">
<label>Employment Industry*</label>
        [text* employmentindustry placeholder "Employment Industry"]
    </div><!-- /.col-md-6 -->
<div class="col-md-6">
<label>Employer Name*</label>
        [text* employer_name placeholder "Employer Name"]
    </div><!-- /.col-md-6 -->
<div class="col-md-4">
<label>Employer Status*</label>
[select* employer_status "Full Time Employed" "Part Time Employed" "Self Employed" "Temporarily Employed" "Student" "Pension" "Disability" "Unemployed"]
    </div><!-- /.col-md-6 -->
<div class="col-md-4">
<label>Length of Employment*</label>
        [text* lengthemployment placeholder "Length of Employment"]
    </div><!-- /.col-md-6 -->
<div class="col-md-4">
<label>Work Phone Number*</label>
        [number* worknumber placeholder "Work Phone Number"]
    </div><!-- /.col-md-4 -->
</div>
<div class="row">
    <div class="col-md-12">
        [submit class:thm-btn "Submit"]
    </div><!-- /.col-md-6 -->
</div><!-- /.row -->
</div>
<div class="contact-one__form">
<div class="row low-gutters">
        <div class="col-md-6">
                [text YourName placeholder "Your Name"]
        </div>
        <div class="col-md-6">
            [email* your-email placeholder "Your Email"]
        </div>
        <div class="col-md-6">
            [number phonenumber placeholder "Phone Number"]
        </div>
        <div class="col-md-6">
            [text Subject placeholder "Subject"]
        </div>
        <div class="col-md-12">
            [textarea WriteMessage placeholder "Write Message"]
            [submit class:thm-btn "Send A Message"]
        </div>
    </div>
</div>
Sidebars & Footer Widgets
You can drug & drop widgets into the sidebars
- Go to Appearance > Widgets.

Translation
Theme is ready for translation and included .pot file. Pylon/language/Pylon.pot
You can translate theme with Poedit or install plugin Locotranslate
More Information here